Android Kotlin日本語チュートリアル-③RecyclerViewでリストを作る

Android Kotlin日本語チュートリアル
本連載記事はこれからAndroidアプリ開発を始める人に向けたチュートリアルです。
コンセプトは
- プログラミングをあまり知らない人でも完走できる
- プログラミングにある程度詳しい人にも満足できる
- 実用的な知識を提供する
- とにかくわかりやすく
で、全9回と長めですが頑張っていきましょう。
このチュートリアルを終える頃には、Android開発の土台が形成されているだけでなくアプリケーションアーキテクチャの知識が出来上がっているはずです。
作成するのは以下のようなメモアプリです。
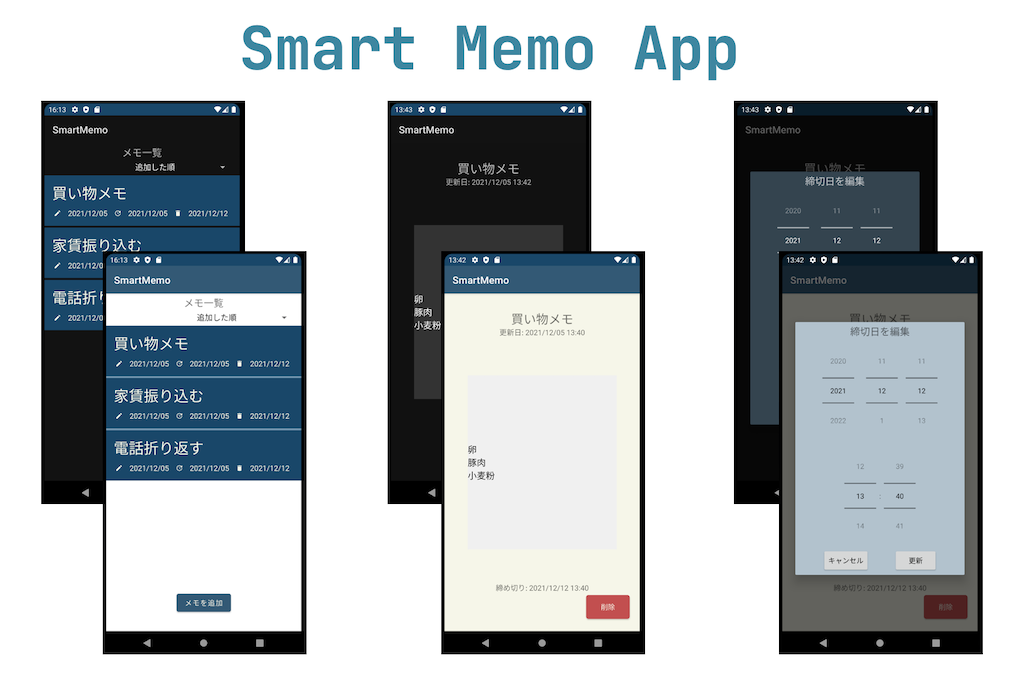
完成品は HiroshiARAKI/AndroidKotlinTutrialで公開していますので適宜参考にしてください。
第3回 : RecyclerViewでリストを作る
第3回はより複雑なUIを作成すべく、RecyclerViewというViewGroupを使ってみましょう。
RecyclerViewは多くのアプリで採用されているフレームですので、しっかりと使い方とその概念を理解しておきましょう。
RecyclerViewについて
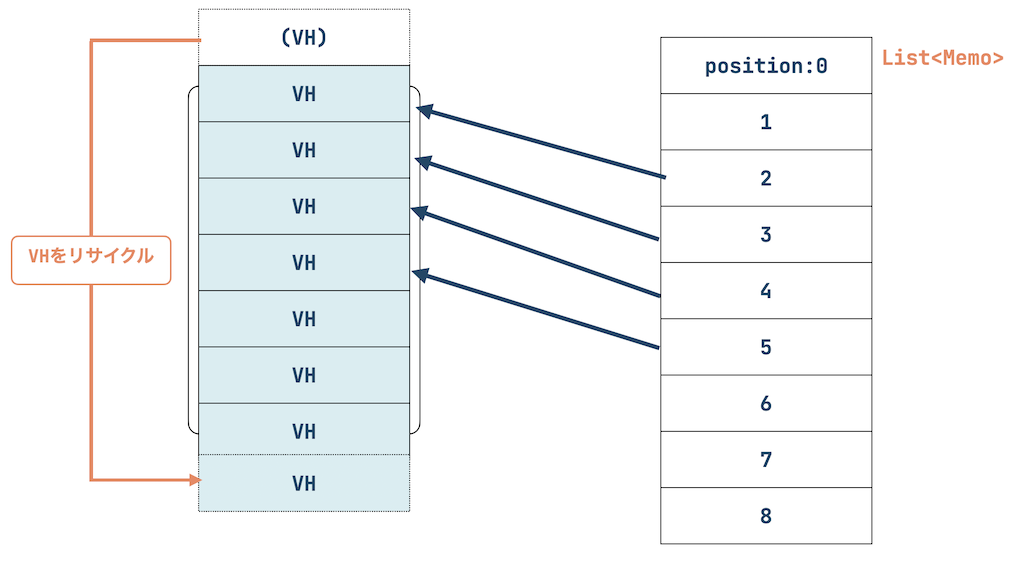
RecyclerViewはその名の通り、Viewをリサイクルすることによって高速なリストスクロールと、メモリ消費の節約を実現しています。
RecyclerViewは大きく分けてRecyclerViewという大枠のViewGroupと、その他3つのパートで作られます。
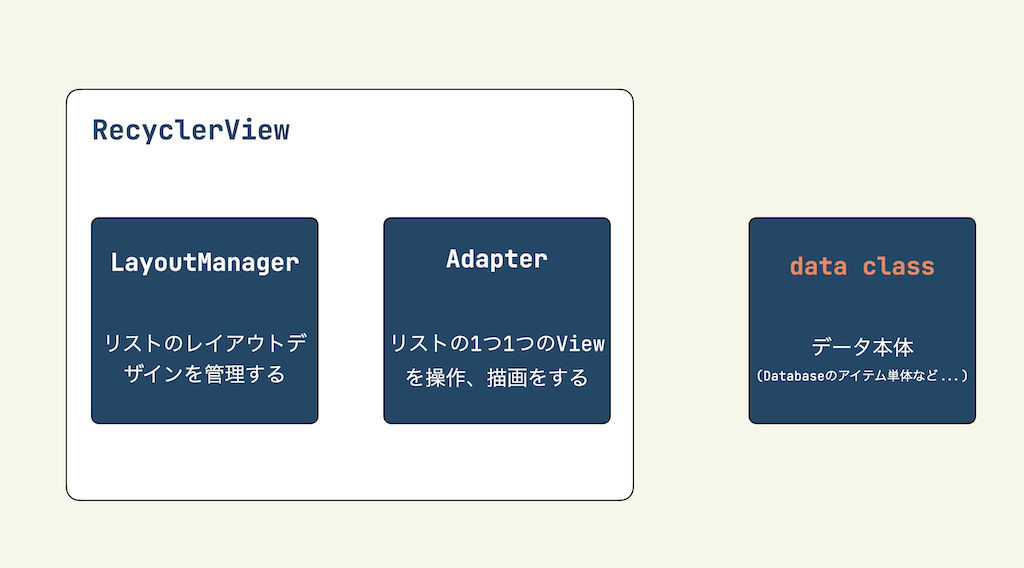
実際にはdata classは、単なるStringなどの基本型でも良いです。
とにかく、Userクラスだとか、Itemクラスだとか、Bookクラスのようなものをイメージしておけば良いです。
実装しながら一つ一つ理解していきましょう。
RecyclerViewを作る
早速MainActivity上にRecyclerViewを作成しましょう。
まずは、activity_main.xmlにRecyclerViewを設置します。
そしてついでにその他のデザインも少し調整しましょう。
activity_main.xml
<?xml version="1.0" encoding="utf-8"?>
<androidx.constraintlayout.widget.ConstraintLayout
    xmlns:android="http://schemas.android.com/apk/res/android"
    xmlns:app="http://schemas.android.com/apk/res-auto"
    xmlns:tools="http://schemas.android.com/tools"
    android:layout_width="match_parent"
    android:layout_height="match_parent"
    tools:context=".MainActivity">

    <FrameLayout
        android:id="@+id/main_container"
        android:layout_width="match_parent"
        android:layout_height="match_parent"
        android:elevation="10dp"/>

    <TextView
        android:id="@+id/main_text"
        android:layout_width="wrap_content"
        android:layout_height="wrap_content"
        android:text="@string/main_text"
        android:textSize="20sp"
        app:layout_constraintBottom_toTopOf="@id/main_list"
        app:layout_constraintLeft_toLeftOf="parent"
        app:layout_constraintRight_toRightOf="parent"
        app:layout_constraintTop_toTopOf="parent"/>

    <androidx.recyclerview.widget.RecyclerView
        android:id="@+id/main_list"
        android:layout_width="match_parent"
        android:layout_height="500dp"
        app:layout_constraintTop_toBottomOf="@id/main_text"
        app:layout_constraintBottom_toTopOf="@id/add_button"/>

    <Button
        android:id="@+id/add_button"
        android:layout_width="wrap_content"
        android:layout_height="wrap_content"
        android:text="@string/main_add_button"
        app:layout_constraintTop_toBottomOf="@id/main_list"
        app:layout_constraintStart_toStartOf="parent"
        app:layout_constraintEnd_toEndOf="parent"
        app:layout_constraintBottom_toBottomOf="parent"/>

</androidx.constraintlayout.widget.ConstraintLayout>
string.xml
<resources>
    <string name="app_name">SmartMemo</string>

    <string name="main_text">メモ一覧</string>
    <string name="main_add_button">メモを追加</string>

    <!--  NewMemoFragment  -->
    <string name="new_memo_text">新しいメモを追加</string>
</resources>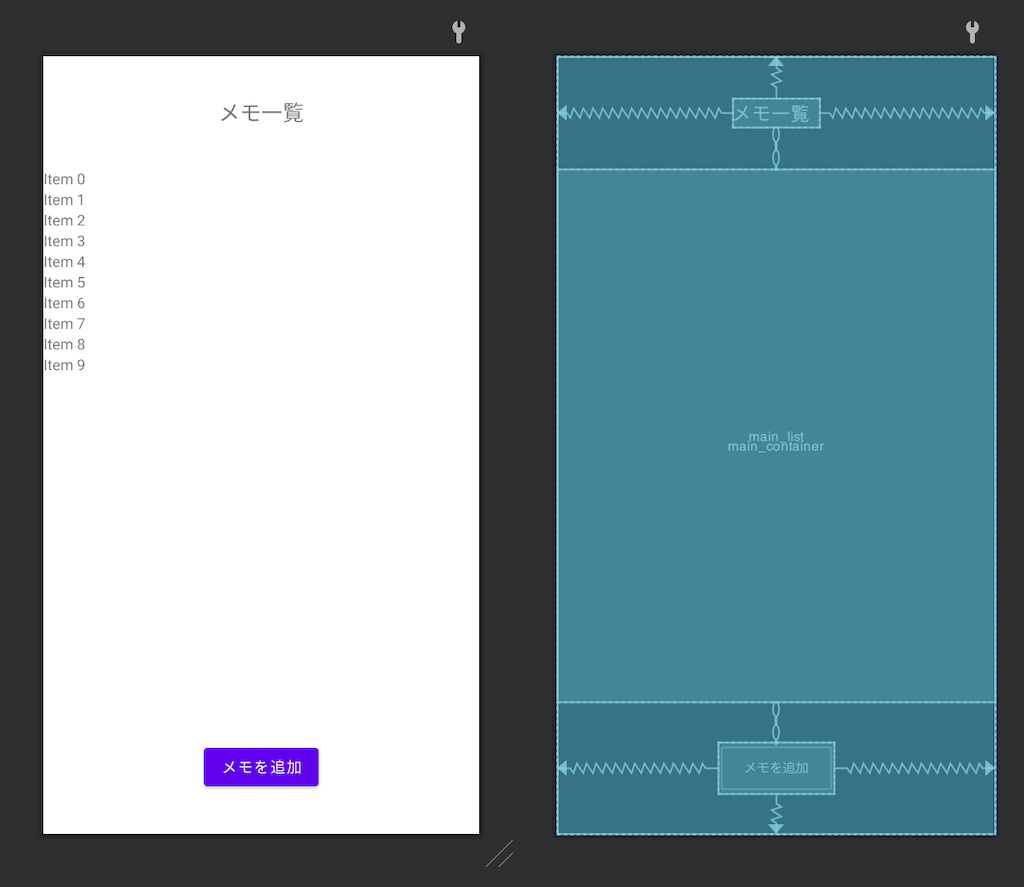
レイアウトプレビューには「Item1」「Item2」のような表示がありますが、実際にこれが表示されるわけではないです。
そうしたら、AdapterとLayoutManagerを用意していきたいのですが、まずはdata classを作ります。
data class Memoの作成
今回はメモアプリですので、一つ一つのデータ単位はMemoです。
以下のようなdata classを作成します。
場所は、MainActivity.ktの階層に新たにdata/ディレクトリ (パッケージ)を追加して作ります。
.src/
├── androidTest
├── main
│   ├── AndroidManifest.xml
│   ├── java
│   │   └── tech.araki.smartmemo
│   │               ├── data
│   │               │    └── Memo.kt
│   │               ├── NewMemoFragment.kt
│   │               └── MainActivity.kt
│   └── res
│       ├── drawable
│       ├── layout
│       ├── values
│       └── values-night
└── test
/**
 * 単一のメモを表すデータクラス
 * @param id ユニークなID
 * @param title メモのタイトル
 * @param contents メモの内容
 * @param createdTimeMillis メモ作成日
 * @param updateTimeMillis メモ更新日
 * @param expireTimeMillis メモの締め切り (廃棄日)
 */
data class Memo(
    val id: Int,
    val title: String,
    val contents: String,
    val createdTimeMillis: Long,
    val updateTimeMillis: Long,
    val expireTimeMillis: Long
)
最低限こんな感じでしょうか。
写真を載せることができる、といった機能が仕様にあればもう少し複雑になりますが今はとりあえずこれでいいでしょう。
ちなみに、作成日などの日付管理はUNIX時刻 (単位: ms)を使う予定です。
理由は、管理が楽だからです。
- Javaの
LocalDateTimeやZonedDateTimeでも日付管理が可能ですが、これらはデータベースなどで管理するのには不向きです
Adapterを作る
RecyclerViewは、その大枠に加えてAdapterとLayoutManagerが必要と説明しましたが、LayoutManagerは既存で用意されているものがいくつかあり、それを使えば基本はOKです。
ただAdapterは自前で用意する必要がありますので作りましょう。
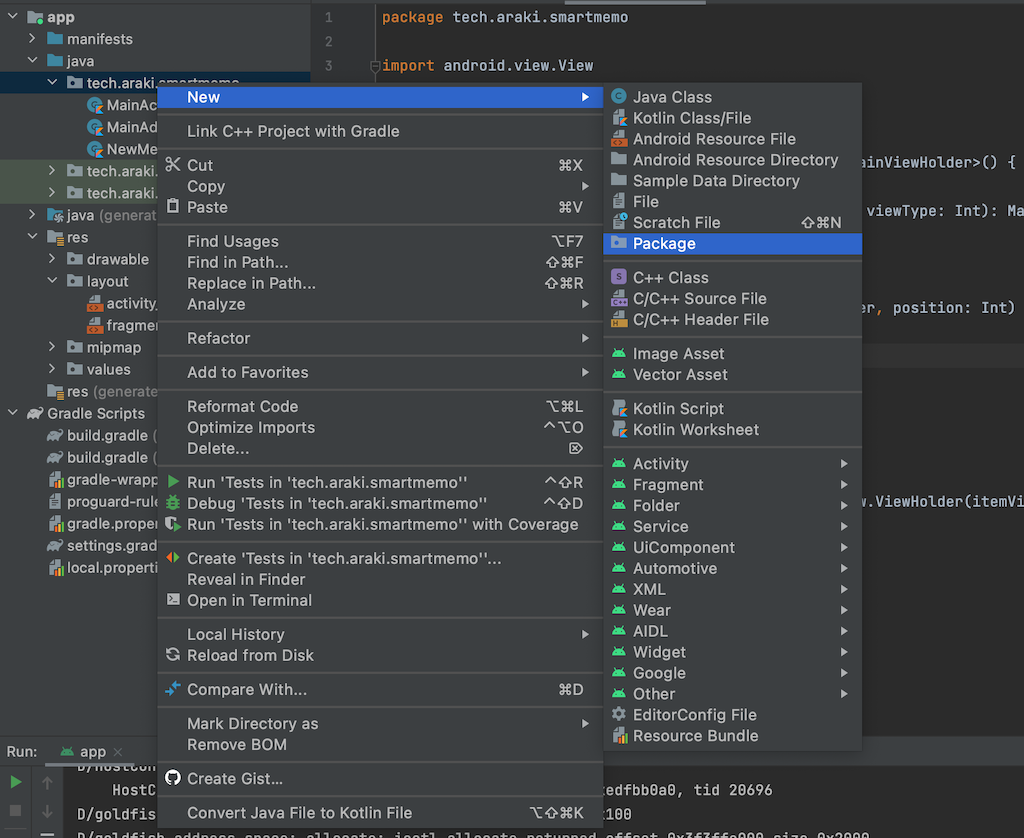
新たにMainActivity.ktと同じ階層で良いので、MainAdapter.ktを作成してください。
class MainAdapter {
}AndroidフレームワークにあるAdapterを継承して作成していきますが、自前のAdapterには自前のViewHolderも必要です。
ちょっと話が複雑になってきましたが、とにかく一度実装してみましょう。
import android.view.View
import androidx.recyclerview.widget.RecyclerView

class MainAdapter : RecyclerView.Adapter<MainAdapter.MainViewHolder>() {

    class MainViewHolder(itemView: View) : RecyclerView.ViewHolder(itemView) {

    }
}
これがよくあるRecyclerView.Adapterの大枠です。
ここでAdapterがViewHolderを使う立場にある、と見てわかると思いますが関係性を簡単にまとめると、
RecyclerView… 子Viewをリサイクルして表示する大枠のViewGroupRecycler.ViewHolder… 一つ一つの要素View (Item View)を保持するホルダーRecyclerView.Adapter… 子View (Adapter View) とデータをViewHolderを介して橋渡しする役割
といった感じでしょうか。
公式ドキュメントにも、Adapterの説明は以下のように書かれています。
An Adapter object acts as a bridge between an AdapterView and the underlying data for that view. The Adapter provides access to the data items. The Adapter is also responsible for making a View for each item in the data set.
[AdapterオブジェクトはAdapterViewとViewで扱う基本的なデータとのブリッジ (橋)として機能します。Adapterはデータアイテムへのアクセスを提供し、データセット内の各アイテムに対するViewを生成する責務もあります。]
(Adapter | Android developers)
まだ理解が追いつかない人もいると思うので、もう少し実装を進めてみましょう。
まずは、リストの一つ一つのレイアウトを設計します。
ファイル名はmemo_item_view.xmlとしておきます。
<?xml version="1.0" encoding="utf-8"?>
<androidx.constraintlayout.widget.ConstraintLayout
    xmlns:android="http://schemas.android.com/apk/res/android"
    android:layout_width="match_parent"
    android:layout_height="wrap_content"
    xmlns:app="http://schemas.android.com/apk/res-auto"
    android:padding="10dp">

    <TextView
        android:id="@+id/memo_title"
        android:layout_width="match_parent"
        android:layout_height="wrap_content"
        android:textSize="30sp"
        android:text="Sample Memo Title"
        app:layout_constraintTop_toTopOf="parent"
        android:padding="5dp"/>

    <TextView
        android:id="@+id/memo_created_date"
        android:layout_width="wrap_content"
        android:layout_height="wrap_content"
        android:textSize="15sp"
        android:text="作成: 2020.01.01"
        app:layout_constraintTop_toBottomOf="@id/memo_title"
        app:layout_constraintEnd_toStartOf="@id/memo_updated_date"
        android:padding="5dp"/>

    <TextView
        android:id="@+id/memo_updated_date"
        android:layout_width="wrap_content"
        android:layout_height="wrap_content"
        android:textSize="15sp"
        android:text="更新: 2020.01.01"
        app:layout_constraintTop_toBottomOf="@id/memo_title"
        app:layout_constraintEnd_toStartOf="@id/memo_expired_date"
        android:padding="5dp"/>

    <TextView
        android:id="@+id/memo_expired_date"
        android:layout_width="wrap_content"
        android:layout_height="wrap_content"
        android:textSize="15sp"
        android:text="締切: 2020.01.01"
        app:layout_constraintTop_toBottomOf="@id/memo_title"
        app:layout_constraintEnd_toEndOf="parent"
        android:padding="5dp"/>

</androidx.constraintlayout.widget.ConstraintLayout>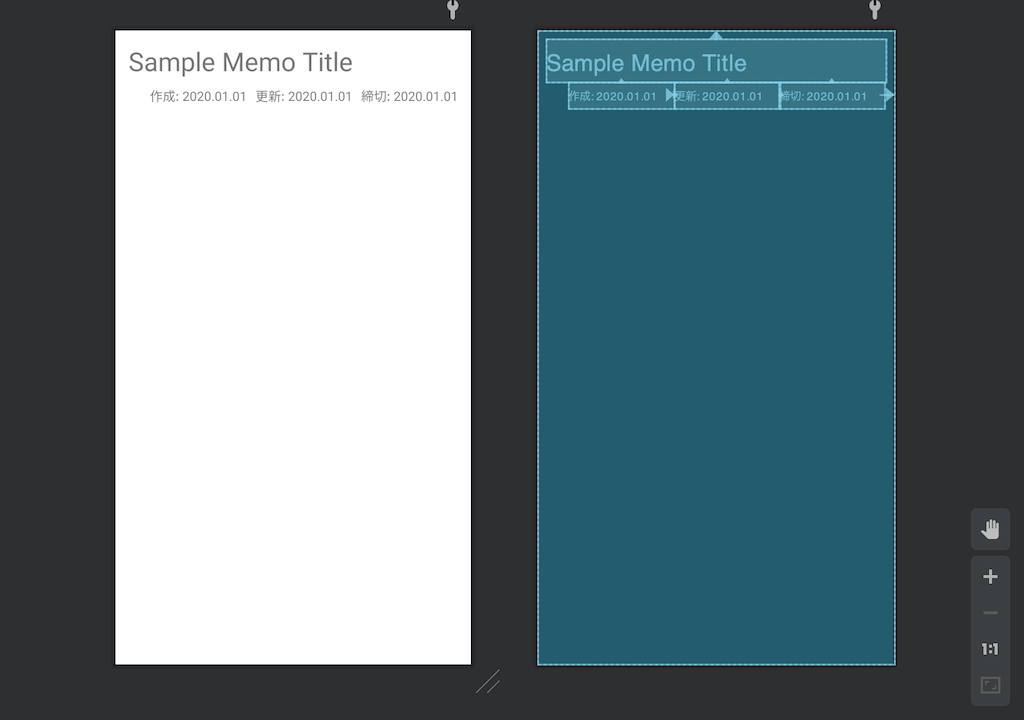
textはサンプルなので実際には記述しなくてOKです。
そうしたら、まだAdapterの抽象メソッドを実装していないので、それらを実装しましょう。
同時に、いずれ渡されるMemoのリストもプロパティとして保持する想定で書いていきます。
import android.view.LayoutInflater
import android.view.View
import android.view.ViewGroup
import android.widget.TextView
import androidx.recyclerview.widget.RecyclerView
import tech.araki.smartmemo.data.Memo
import java.time.Instant
import java.time.ZoneId
import java.time.format.DateTimeFormatter

class MainAdapter(memoItems: List<Memo>) :
    RecyclerView.Adapter<MainAdapter.MainViewHolder>() {

    private val memoItems: MutableList<Memo> = memoItems.toMutableList()

    // ItemViewのレイアウトをViewHolderにInflateする
    override fun onCreateViewHolder(parent: ViewGroup, viewType: Int): MainViewHolder {
        return MainViewHolder(
            LayoutInflater.from(parent.context).inflate(R.layout.memo_item_view, parent, false)
        )
    }

    // ViewHolderが作られた時や更新された時に呼ばれるメソッド
    // ここでViewの中身を決めたりViewの設定を行う
    override fun onBindViewHolder(holder: MainViewHolder, position: Int) {
        // positionからどのデータをViewHolderに保持させるViewを決める
        val memo = memoItems[position]

        holder.title.text = memo.title
        holder.createdDate.text = memo.createdTimeMillis.toDateString()
        holder.updatedData.text = memo.updateTimeMillis.toDateString()
        holder.expiredDate.text = memo.expireTimeMillis.toDateString()
    }

    override fun getItemCount(): Int = memoItems.size

    // 一つ一つのItemViewを持つ (Holdする) ViewHolder
    class MainViewHolder(itemView: View) : RecyclerView.ViewHolder(itemView) {
        val title: TextView = itemView.findViewById(R.id.memo_title)
        val createdDate: TextView = itemView.findViewById(R.id.memo_created_date)
        val updatedData: TextView = itemView.findViewById(R.id.memo_updated_date)
        val expiredDate: TextView = itemView.findViewById(R.id.memo_expired_date)
    }

    // UNIX epoch time millis to String
    private fun Long.toDateString() =
        Instant.ofEpochMilli(this)
            .atZone(ZoneId.systemDefault())
            .format(DATE_FORMATTER)

    companion object {
        private const val DATE_FORMAT = "yyyy/MM/dd"
        private val DATE_FORMATTER = DateTimeFormatter.ofPattern(DATE_FORMAT)
    }
}
各所でコメントも添えてみましたので確認してください。
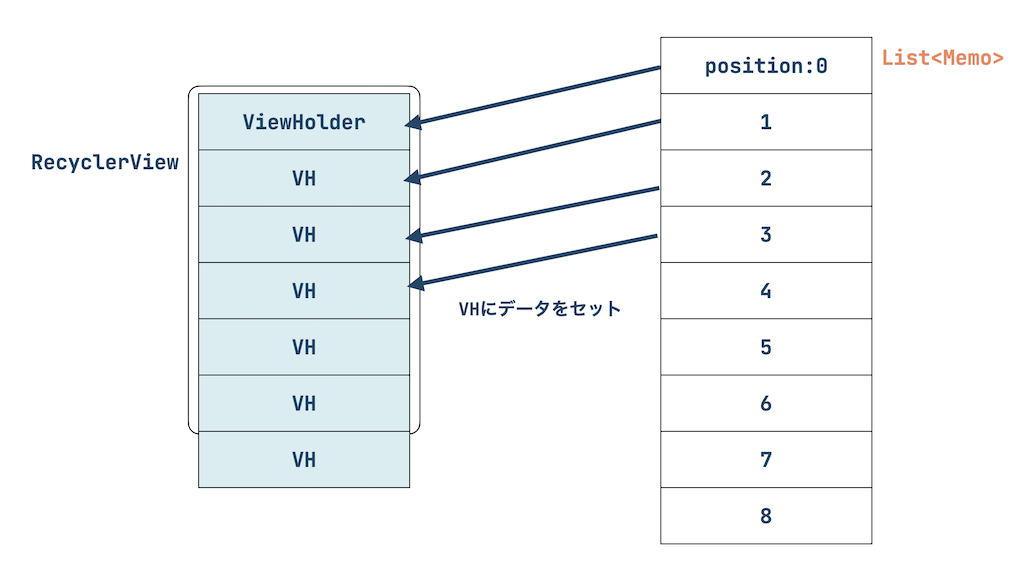
かなりざっくりですが、positionとViewHolder、そしてRecyclerViewの関係性は以下の図のようなイメージです。
AdapterとLayoutManagerをRecyclerViewにセットする
それでは全ての要素を合わせていきましょう。
リストの中身は適当なフェイクデータを使います。
import java.util.concurrent.TimeUnit

/**
 * 単一のメモを表すデータクラス
 * @param id ユニークなID
 * @param title メモのタイトル
 * @param contents メモの内容
 * @param createdTimeMillis メモ作成日
 * @param updateTimeMillis メモ更新日
 * @param expireTimeMillis メモの締め切り (廃棄日)
 */
data class Memo(
    val id: Int,
    val title: String,
    val contents: String,
    val createdTimeMillis: Long,
    val updateTimeMillis: Long,
    val expireTimeMillis: Long
) {
    companion object {
        /**
         * creates 10 Fake Memos
         */
        fun createFakes(): List<Memo> {
            val now = System.currentTimeMillis()
            return List(10) {
                Memo(
                    id = it,
                    title = "Memo $it",
                    contents = "memo description",
                    createdTimeMillis = now,
                    updateTimeMillis = now,
                    expireTimeMillis = now + TimeUnit.DAYS.toMillis(7)
                )
            }
        }
    }
}MainActivity側でRecyclerViewにセットしていきます。
class MainActivity : AppCompatActivity() {
    override fun onCreate(savedInstanceState: Bundle?) {
        super.onCreate(savedInstanceState)
        setContentView(R.layout.activity_main)

        val addButton: Button = findViewById(R.id.add_button)

        val recyclerView: RecyclerView = findViewById(R.id.main_list)
        recyclerView.layoutManager = LinearLayoutManager(this)
        recyclerView.adapter = MainAdapter(Memo.createFakes())

        addButton.setOnClickListener {
            supportFragmentManager.beginTransaction().run {
                add(R.id.main_container, NewMemoFragment())
                addToBackStack(null)
                commit()
            }
        }
    }
}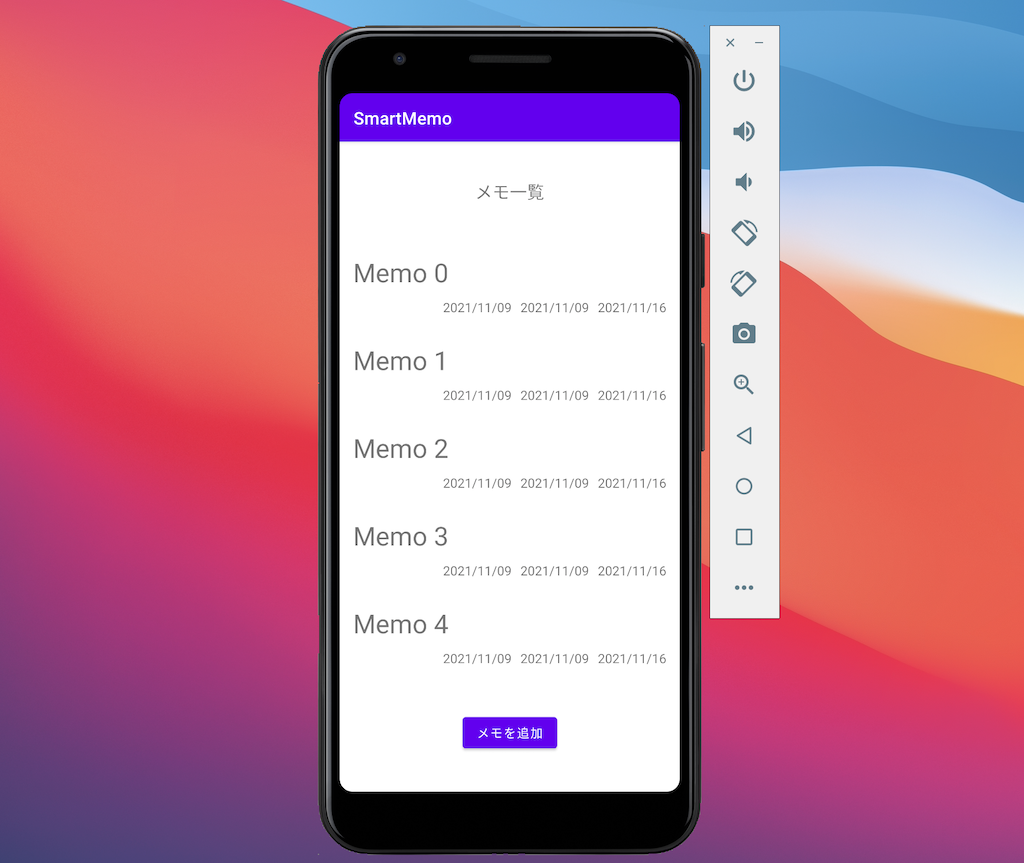
しっかりリスト形式のViewが出来上がっていますね。
ですがちょっとデザインが見にくいですね。
デザインを少しだけ凝ってみましょう。
ItemDecorationを追加する
RecyclerViewでは、各ViewHolderに対してデコレーションを追加できます。
これはRecyclerView.ItemDecorationで設定することができ、デフォルトのAndroidフレームワークではDivierItemDecorationが用意されているのでこれを使ってみましょう。
class MainActivity : AppCompatActivity() {
    override fun onCreate(savedInstanceState: Bundle?) {
        super.onCreate(savedInstanceState)
        setContentView(R.layout.activity_main)

        val addButton: Button = findViewById(R.id.add_button)

        val recyclerView: RecyclerView = findViewById(R.id.main_list)
        recyclerView.layoutManager = LinearLayoutManager(this)
        recyclerView.adapter = MainAdapter(Memo.createFakes())
        recyclerView.addItemDecoration(
            DividerItemDecoration(this, DividerItemDecoration.VERTICAL)
        )

        addButton.setOnClickListener {
            supportFragmentManager.beginTransaction().run {
                add(R.id.main_container, NewMemoFragment())
                addToBackStack(null)
                commit()
            }
        }
    }
}
ViewHolder同士の間にDivider (区切り線)が表示されました。
このように各ViewHolderに対して何かしらのデコレーションを加えられるのがItemDecorationです。
第3回のまとめ
- Andoirdでリストやグリッド形式の複雑なViewを作成するときは
RecyclerViewを使う - RecyclerViewは
Adapter、ViewHolder、LayoutManagerで構成される - AdapterとViewHolderは自前で用意する必要がある
LayoutManagerは任意で、LinearLayoutManagerなどAndroidで用意されているものも使うことができる- RecyclerViewのViewHolder単位での追加デコレーションは
ItemDecorationを使う
おわりに
第3回はここで終わりです。
次回は、Androidの推奨アーキテクチャを学ぶとともに、Androidではとても大事なViewModelについても学びます。
まだまだ本チュートリアルも長いですが、一つ一つ丁寧にこなしていきましょう。
もし、途中で説明が理解できず挫折しそうになったら、もう諦めてとりあえず完走することを目指してみてください。
とにかくコピペでも良いので、完走してから理解できなかった要素を復習すれば良いのです。
次回も頑張りましょう!